外观
01_HBuilder 编辑器 + 内置组件 + Vue3 基础语法
01_HBuilder 编辑器
01_HBuilder 创建 Vue3 项目
01_HBuilder 下载安装
HBuilder 官网
解压安装包
- 首先, 选中下载的 zip 包, 点击右键菜单, 点击解压到当前文件夹
- 进入解压后的文件夹, 找到 HBuilderX.exe, 直接点击打开
02_HBuilder 创建 Vue3 项目
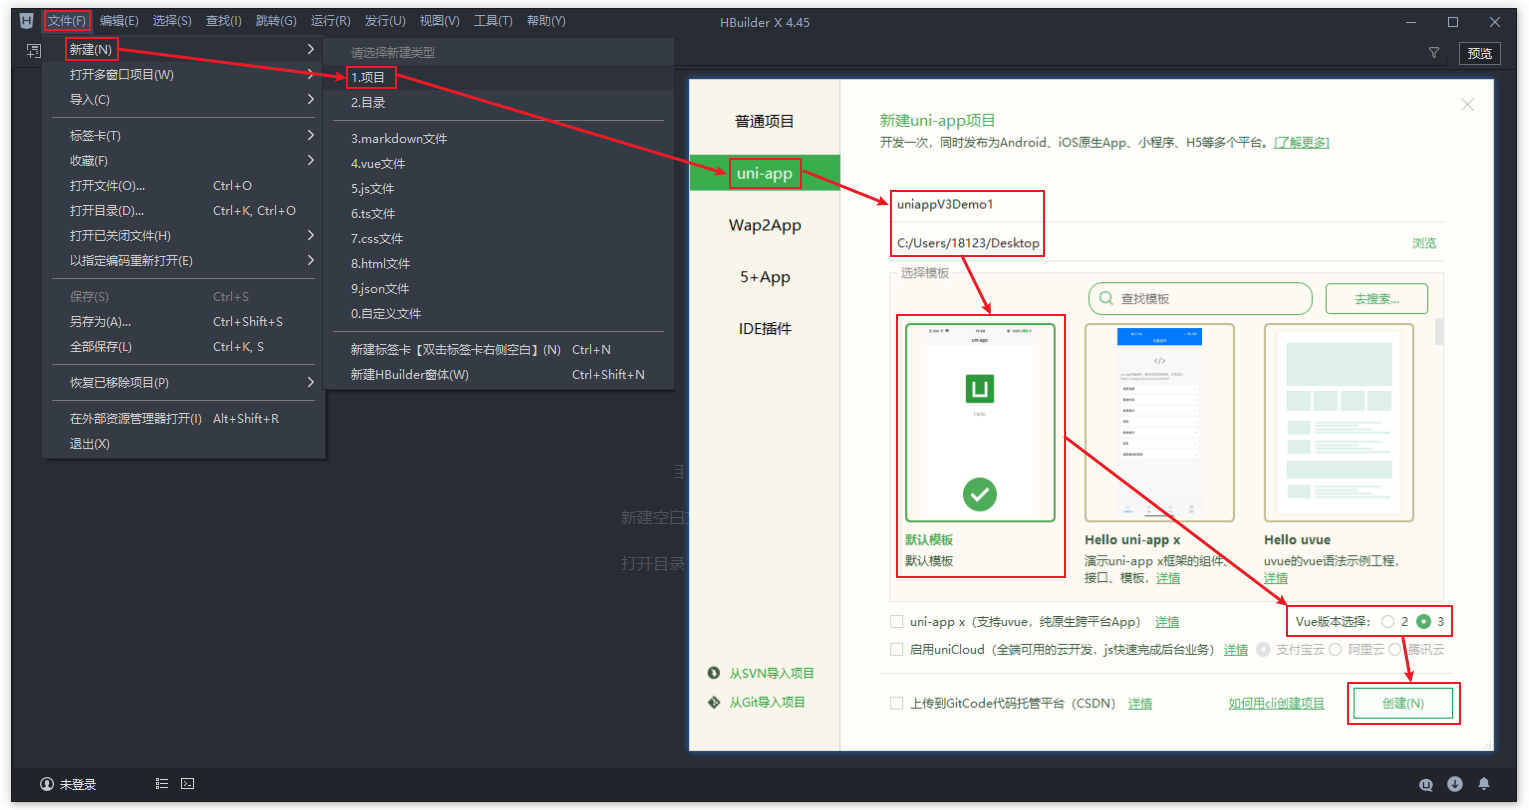
- 文件 ==> 新建 ==> 项目 ==> uni-app ==> 项目名称
uniappV3Demo1==> 位置C:/Users/18123/Desktop==> 选择模板默认模板==> Vue 版本选择 3 ==> 创建
02_目录结构
bash
┌─pages                 业务页面文件存放的目录
│  ├─index
│  │  └─index.vue       index 页面
│  └─list
│     └─list.vue        list 页面
├─static                存放应用引用的本地静态资源 (如图片、视频等) 的目录
├─App.vue               应用配置, 用来配置 App 全局样式以及监听 应用生命周期
├─main.js               Vue 初始化入口文件
├─pages.json            配置页面路由、导航条、选项卡等页面类信息
└─uni.scss 内置的常用样式变量02_运行到浏览器 + 运行到小程序
01_运行到 Chrome 浏览器
浏览器运行配置
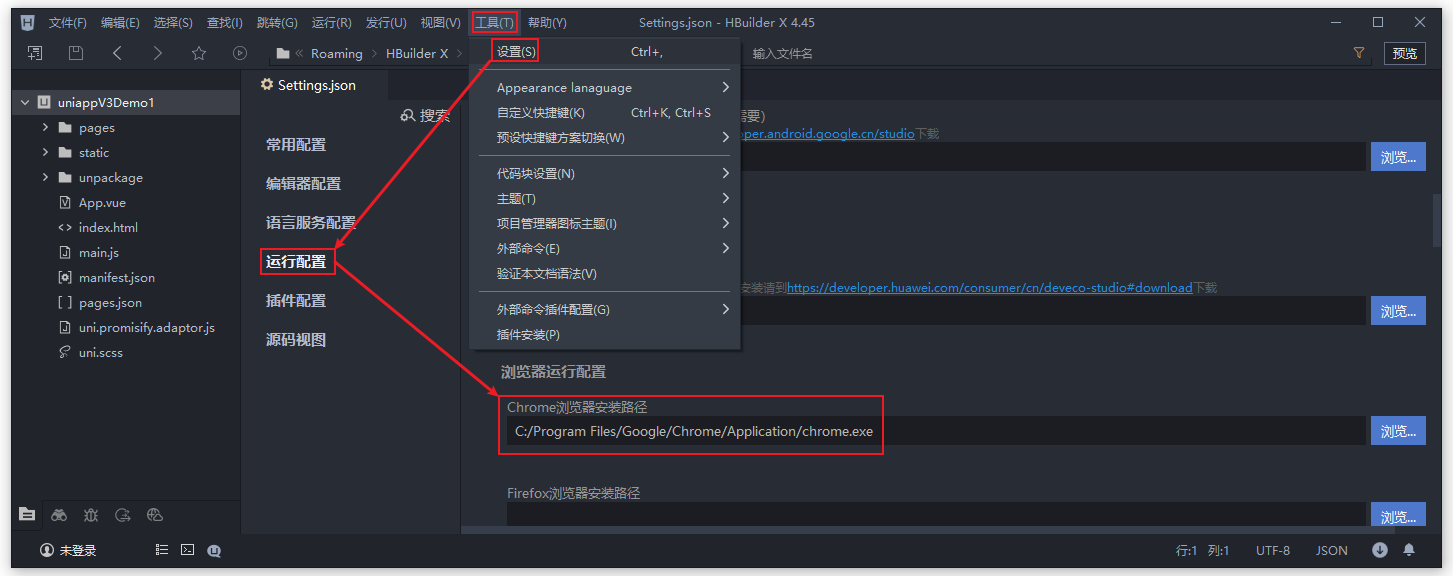
- 工具 ==> 设置 ==> 运行配置 ==> 浏览器运行配置 ==> Chrome 浏览器安装路径
C:/Program Files/Google/Chrome/Application/chrome.exe
运行到 Chrome 浏览器
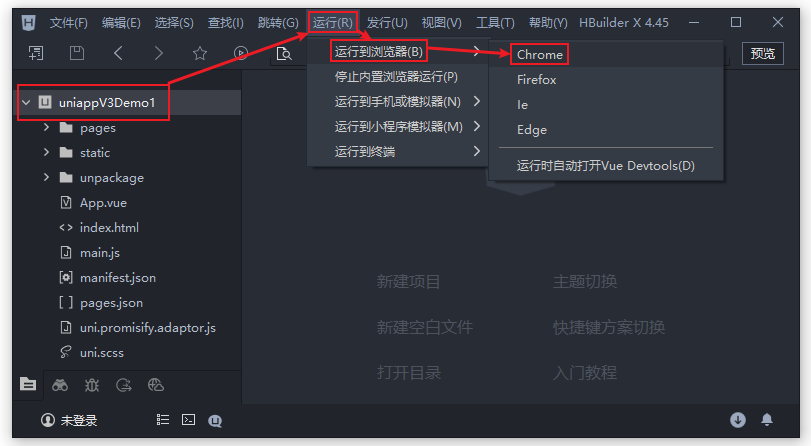
- 项目 ==> 运行 ==> 运行到浏览器 ==> Chrome
02_运行到微信开发者工具
微信开发者工具官网
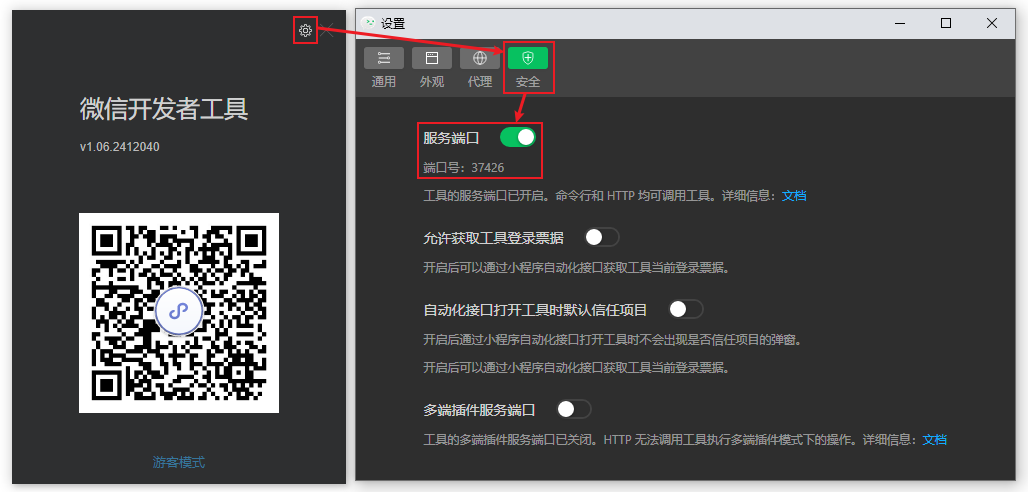
微信开发者工具 打开 服务端口
- 设置 ==> 安全 ==> 打开
服务端口
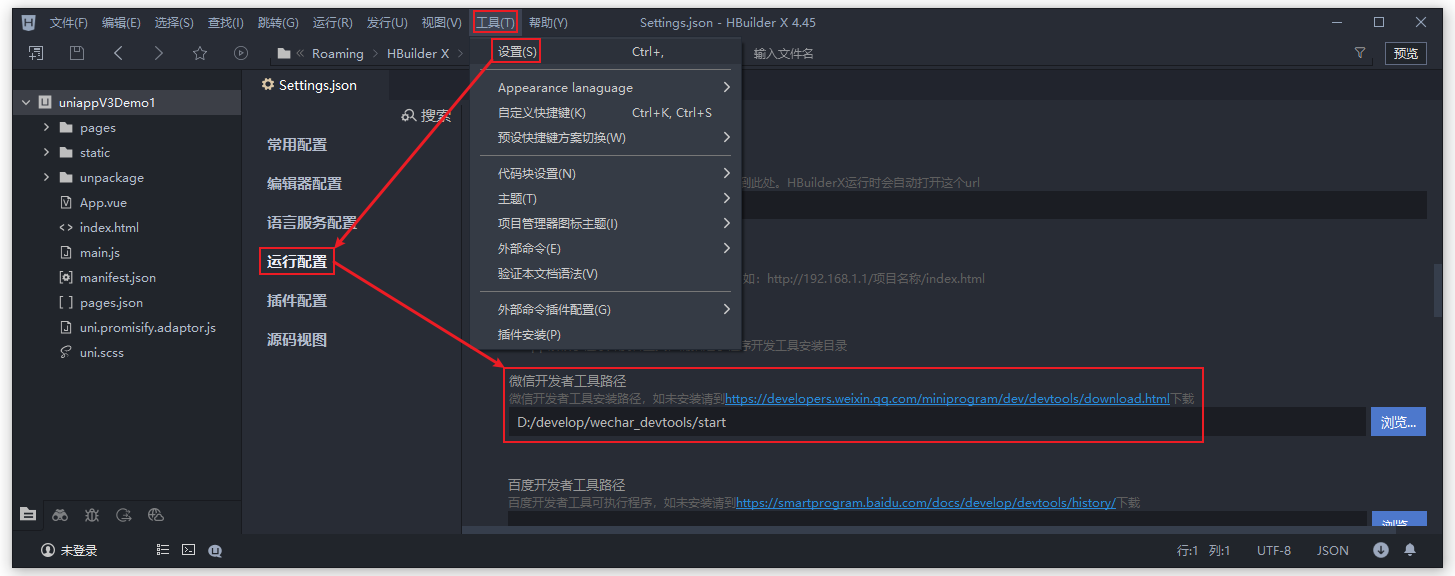
小程序运行配置
- 工具 ==> 设置 ==> 运行配置 ==> 小程序运行配置 ==> 微信开发者工具路径
D:/develop/wechar_devtools/start
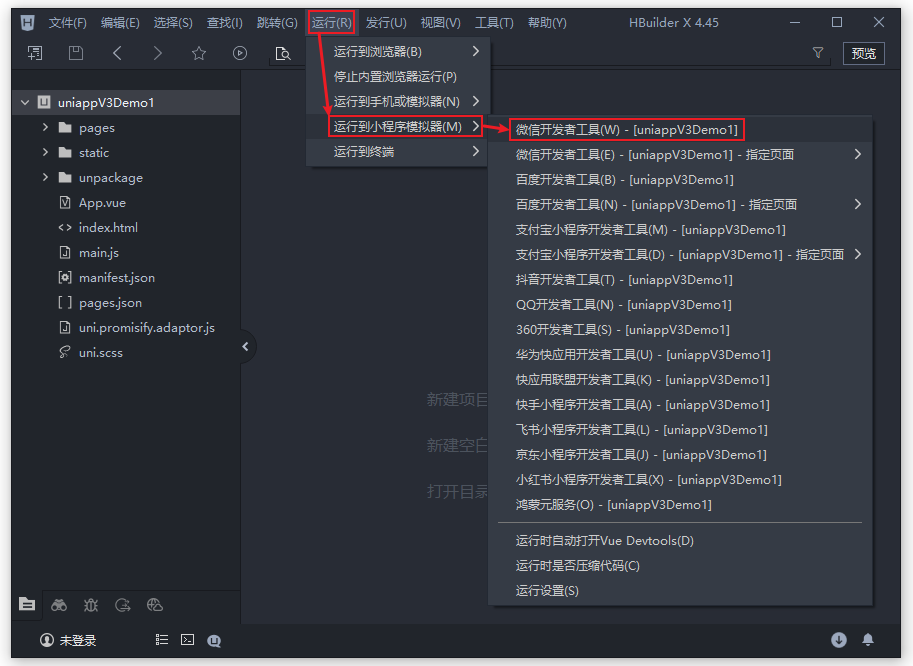
运行到小程序模拟器
- 运行 ==> 运行到小程序模拟器 ==> 微信开发者工具
03_新建 uniapp 页面
01_页面的结构
html
<!-- /uniappV3Demo1/pages/index/index.vue -->

<template>
	<!-- 1.多个根节点 -->
	<view class="layout">
		<div class="box1">box1</div>
		<div class="box2">box2</div>
	</view>
</template>

<!-- 2.单文件语法糖 -->
<script setup>

</script>

<!-- 3.scss 预处理 -->
<style lang="scss">
.layout {
	border: 1px solid red;
	.box1 {
		border: 1px solid green;
	}
	.box2 {
		border: 1px solid blue;
	}
}
</style>02_新建 uniapp 页面
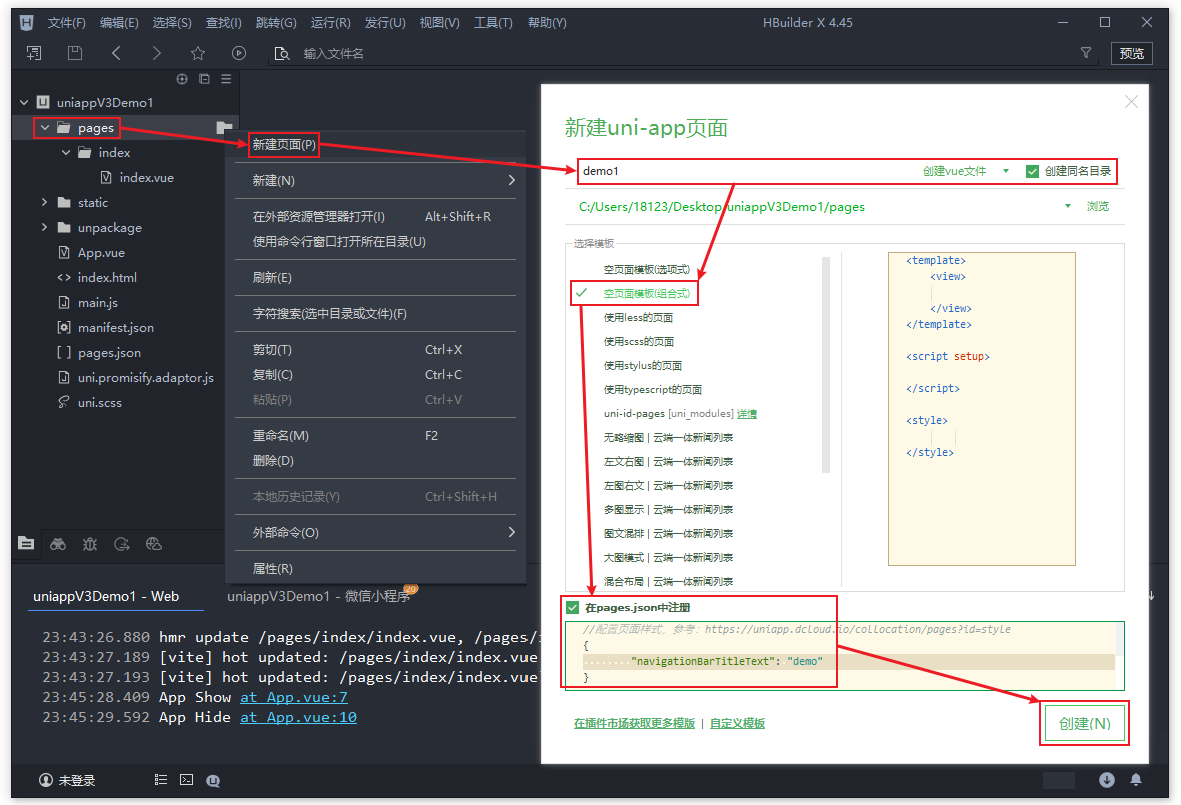
- pages ==> 新建页面 ==> 请输入页面名称
demo1==> 勾选 创建同名目录 ==> 选择模板空页面模板(组合式)==> 勾选 在 pages.json 中注册 ==> "navigationBarTitleText": "demo" ==> 创建
03_pages 设置页面路径及窗口表现
json
// /uniappV3Demo1/pages.json
{
	// 1.设置页面路径及窗口表现
	"pages": [ // pages 数组中第一项表示应用启动页, 参考: https://uniapp.dcloud.io/collocation/pages
		{
			// 2.配置页面路径
			"path": "pages/demo1/demo1",
			// 3.配置页面窗口表现, 配置项
			"style": {
				// 4.导航栏标题文字内容
				"navigationBarTitleText": "demo"
			}
		},
		{
			"path": "pages/index/index",
			"style": {
				"navigationBarTitleText": "uni-app"
			}
		}
	],
	"globalStyle": {
		"navigationBarTextStyle": "black",
		"navigationBarTitleText": "uni-app",
		"navigationBarBackgroundColor": "#F8F8F8",
		"backgroundColor": "#F8F8F8"
	},
	"uniIdRouter": {}
}04_自定义模板
01_自定义模板
- pages ==> 新建页面 ==> 自定义模板 ==> 在打开的目录中 创建 Vue3Setupo.vue 文件, 并填写下面内容
html
<template>
  <view class="">

  </view>
</template>

<script setup>

</script>

<style lang="scss" scoped></style>02_内置组件
01_view 视图容器 + text 文本
01_view 视图容器
它类似于传统 html 中的 div, 用于包裹各种元素内容
html
<!-- /uniappV3Demo1/pages/index/index.vue -->

<template>
	<!-- 1.hover-class 指定按下去的样式类 -->
	<view class="box" hover-class="boxHover">
		<!-- 2.hover-stop-propagation 指定是否阻止本节点的祖先节点出现点击状态 -->
		<view class="inner" hover-class="innerHover" hover-stop-propagation>内部元素</view>
	</view>
</template>

<script setup>

</script>

<style lang="scss" scoped>
.box{
    width: 200px;
    height: 200px;
    background: #ccc;
}
.boxHover{
    background: orange;
    width: 300px;
}
.inner{
    width: 150px;
    height: 150px;
    background: green;
}
.innerHover{
    background: greenyellow;
}
</style>02_text 文本
html
<!-- /uniappV3Demo1/pages/index/index.vue -->

<template>
  <!-- 1.selectable 文本是否可选; space 显示连续空格, emsp 中文字符空格一半大小 -->
  <text selectable space="emsp">text 文    本标签</text>
</template>

<script setup>

</script>

<style lang="scss" scoped></style>02_scroll-view 可滚动视图区域
01_scroll-view 可滚动视图区域
html
<!-- /uniappV3Demo1/pages/index/index.vue -->

<template>
  <!-- 1.scroll-x 允许横向滚动 -->
  <scroll-view scroll-x class="scrollView">
    <view class="box">scroll 子元素</view>
    <view class="box">scroll 子元素</view>
    <view class="box">scroll 子元素</view>
    <view class="box">scroll 子元素</view>
    <view class="box">scroll 子元素</view>
    <view class="box">scroll 子元素</view>
  </scroll-view>
</template>

<script setup>

</script>

<style lang="scss" scoped>
.scrollView {
  width: 80%;
  height: 220px;
  border: 1px solid red;
  white-space: nowrap;

  .box {
    width: 100px;
    height: 100px;
    background: green;
    display: inline-block;
    margin: 5px;
  }
}
</style>03_swiper 滑块视图容器
01_swiper 滑块视图容器
html
<!-- /uniappV3Demo1/pages/index/index.vue -->

<template>
  <view>
    <!-- indicator-dots 显示面板指示点; indicator-color 指示点颜色; indicator-active-color 当前选中的指示点颜色 -->
    <!-- circular 采用衔接滑动; autoplay 自动切换; interval 自动切换时间间隔; vertical 滑动方向为纵向 -->
    <swiper indicator-dots indicator-color="rgba(255,255,255,0.3)" indicator-active-color="#ffffff"
    circular autoplay interval="2000" vertical>
      <swiper-item>11111</swiper-item>
      <swiper-item>2222</swiper-item>
      <swiper-item>333</swiper-item>
      <swiper-item>44444</swiper-item>
    </swiper>
  </view>
</template>

<script setup>

</script>

<style lang="scss" scoped>
swiper {
  width: 100vw;
  height: 200px;
  border: 1px solid green;

  swiper-item {
    width: 100%;
    height: 100%;
    background: pink;
  }

  swiper-item:nth-child(2n) {
    background: orange;
  }
}
</style>04_image 图片 + swiper 滑块视图容器
01_image 图片
html
<!-- /uniappV3Demo1/pages/index/index.vue -->

<template>
  <view>
    <!-- 1.未设置宽高时, 默认宽度 320px, 高度 240px; mode 图片裁剪, 缩放的模式 -->
    <image src="../../static/logo.png" mode=""></image>

    <!-- 2.scaleToFill(默认) 不保持纵横比缩放图片, 使图片的宽高完全拉伸至填满 image 元素 -->
    <image src="../../static/pic3.webp" mode="" class="pic2"></image>

    <!-- 3.aspectFit 保持纵横比缩放图片, 使图片的长边能完全显示出来; 也就是说, 可以完整地将图片显示出来 -->
    <image src="../../static/pic3.webp" mode="aspectFit" class="pic2"></image>

    <!-- 4.aspectFill 保持纵横比缩放图片, 只保证图片的短边能完全显示出来; 也就是说, 图片通常只在水平或垂直方向是完整的, 另一个方向将会发生截取 -->
    <image src="../../static/pic3.webp" mode="aspectFill" class="pic2"></image>

    <!-- 5.widthFix 宽度不变, 高度自动变化, 保持原图宽高比不变 -->
    <image src="../../static/pic4.jpg" mode="widthFix" class="pic3"></image>

    <!-- 6.heightFix 高度不变, 宽度自动变化, 保持原图宽高比不变 -->
    <image src="../../static/pic4.jpg" mode="heightFix" class="pic4"></image>
  </view>
</template>

<script setup>

</script>

<style lang="scss" scoped>
.pic2 {
  width: 200px;
  height: 200px;
}

.pic3 {
  width: 300px;
}

.pic4 {
  height: 300px;
}
</style>02_image 图片 + swiper 滑块视图容器
html
<!-- /uniappV3Demo1/pages/index/index.vue -->

<template>
  <view>
    <!-- indicator-dots 显示面板指示点; indicator-color 指示点颜色; indicator-active-color 当前选中的指示点颜色 -->
    <!-- circular 采用衔接滑动; autoplay 自动切换; interval 自动切换时间间隔; vertical 滑动方向为纵向 -->
    <swiper indicator-dots indicator-color="rgba(255,255,255,0.3)" indicator-active-color="#ffffff"
    circular autoplay interval="2000" vertical>
      <!-- aspectFill 保持纵横比缩放图片, 只保证图片的短边能完全显示出来; 也就是说, 图片通常只在水平或垂直方向是完整的, 另一个方向将会发生截取 -->
      <swiper-item><image src="../../static/pic1.png" mode="aspectFill"></image></swiper-item>
      <swiper-item><image src="../../static/pic2.png" mode="aspectFill"></image></swiper-item>
      <swiper-item><image src="../../static/pic3.webp" mode="aspectFill"></image></swiper-item>
      <swiper-item><image src="../../static/pic4.jpg" mode="aspectFill"></image></swiper-item>
    </swiper>
  </view>
</template>

<script setup>

</script>

<style lang="scss" scoped>
swiper {
  width: 100vw;
  height: 200px;
  border: 1px solid green;

  swiper-item {
    width: 100%;
    height: 100%;
    background: pink;

    image {
      width: 100%;
      height: 100%;
    }
  }

  swiper-item:nth-child(2n) {
    background: orange;
  }
}
</style>05_navigator 页面跳转
01_navigator 页面跳转
html
<!-- /uniappV3Demo1/pages/index/index.vue -->

<template>
  <view>
    <!-- 1.open-type 跳转方式; navigate(默认) 保留当前页面, 跳转到应用内的某个页面 -->
    <navigator url="/pages/demo1/demo1" open-type="navigate">
      跳转到 demo1
    </navigator>

    <!-- 2.reLaunch 关闭所有页面, 打开到应用内的某个页面 -->
    <navigator url="/pages/demo1/demo1" open-type="reLaunch">
      跳转到 demo1
    </navigator>
  </view>
</template>

<script setup>

</script>

<style lang="scss" scoped></style>06_button 按钮 + input 单行输入框
01_button 按钮
html
<!-- /uniappV3Demo1/pages/index/index.vue -->

<template>
  <view>
    <!-- 1.size 按钮的大小; default 默认大小; type 按钮的样式类型; primary 绿色, 蓝色, 浅蓝色; loading 名称前是否带 loading 图标 -->
    <button size="default" type="primary" loading>按钮</button>

    <!-- 2.mini 小尺寸; warn 红色; disabled 是否禁用 -->
    <button size="mini" type="warn" disabled>按钮</button>
  </view>
</template>

<script setup>

</script>

<style lang="scss" scoped></style>02_input 单行输入框
html
<!-- /uniappV3Demo1/pages/index/index.vue -->

<template>
  <view>
    <!-- type input 的类型; text 文本输入键盘; placeholder 输入框为空时占位符; placeholder-style 指定 placeholder 的样式 -->
    <!-- confirm-type: 设置键盘右下角按钮的文字, 仅在 type="text" 时生效; search 右下角按钮为 "搜索" -->
    <input type="text" placeholder="请输入搜索内容" placeholder-style="color: orange" confirm-type="search" />

    <!-- tel 电话输入键盘; maxlength 最大输入长度, 设置为 -1 的时候不限制最大长度 -->
    <input type="tel" placeholder="请输入搜索内容" maxlength="11"  />
  </view>
</template>

<script setup>

</script>

<style lang="scss" scoped></style>03_Vue3 基础语法
01_ 插值语法
01_ 插值语法
html
<!-- /uniappV3Demo1/pages/index/index.vue -->

<template>
  <!-- 1.文本插值 -->
  <view>
    姓名: 张三
  </view>

  <!-- 2.JavaScript 表达式 -->
  <view>
    {{ 2 + 3 }}
  </view>
  <view>
    {{ a + 5 }}
  </view>
  <view>{{ Date.now() }}</view>
  <view>{{ Math.random() }}</view>
  <view>{{ 1 < 2 ? '张三' : "李四" }}</view>

  <!-- 3.调用函数 -->
  <view>{{ fn() }}</view>
</template>

<script setup>
const a = 6;
function fn() {
  return "Vue3 学习"
}
</script>

<style lang="scss" scoped></style>02_ref() 响应式数据
01_ref() 响应式数据
html
<!-- /uniappV3Demo1/pages/index/index.vue -->

<template>
  <view>{{ num1 }}</view>

  <!-- 3.在模板中使用 ref 时, 我们不需要附加 .value  -->
  <view>{{ num2 }}</view>
  <view>{{ test }}</view>
  <view>{{ arr[2] }}</view>
  <view>{{ obj }}</view>
</template>

<script setup>
import { ref } from "vue";

// 1.num1 变量并不是响应式的
let num1 = 6
// setInterval(()=>{
//  num1++;
//  console.log(num1);
// },1000)

// 2.使用 ref 函数创建响应式变量, 返回一个包含 value 属性的对象
let num2 = ref(10);
setInterval(() => {
  num2.value++;
  console.log(num2.value);
}, 1000)

// 4.字符串, 数组, 对象... 都可以使用 ref 函数创建响应式变量
let test = ref("咸虾米");

let arr = ref([1, 2, 3, 4]);

let obj = ref({ name: "王五", age: 18 })
obj.value.name = "李四"
</script>

<style lang="scss" scoped></style>03_v-bind 属性绑定
01_v-bind 属性绑定
html
<!-- /uniappV3Demo1/pages/index/index.vue -->

<template>
  <view>
    <!-- 1.想要响应式地绑定一个属性, 应该使用 v-bind -->
    <image v-bind:src="picurl" mode=""></image>

    <!-- 2.v-bind 简写语法 :  -->
    <image v-bind:src="picurl" mode=""></image>
  </view>
</template>

<script setup>
import { ref } from "vue";
const picurl = ref("../../static/pic1.png");
</script>

<style lang="scss" scoped></style>02_图片切换案例
html
<!-- /uniappV3Demo1/pages/index/index.vue -->

<template>
  <view>
    <image v-bind:src="picurl" mode=""></image>
  </view>
</template>

<script setup>
import { ref } from "vue";

// 1.定义图片数组
const arrs = ref([
  "../../static/pic1.png",
  "../../static/pic2.png",
  "../../static/pic3.webp",
  "../../static/pic4.jpg"
]);

// 2.默认显示第一张图片
const picurl = ref("../../static/pic1.png");

// 3.定时器, 每 1 秒切换一次图片
let i= 0;
setInterval(()=>{
  i++;
  picurl.value = arrs.value[i%4];
}, 1000);
</script>

<style lang="scss" scoped></style>04_class 绑定类 + style 绑定样式
01_class 绑定类
html
<!-- /uniappV3Demo1/pages/index/index.vue -->

<template>
  <!-- 1.传递一个对象来动态切换 class -->
  <view class="box" :class="{ active: isActive }">
    v-bind指令
  </view>

  <!-- 2.使用三元表达式, 来动态切换 class -->
  <view class="box" :class="isActive ? 'active' : ''"></view>
</template>

<script setup>
import { ref } from "vue";

const isActive = ref(true);

// 3.使用定时器来动态切换 class
setInterval(() => {
  isActive.value = !isActive.value;
}, 1000)
</script>

<style lang="scss" scoped>
.box {
  width: 200px;
  height: 200px;
  background: orange;
  font-size: 20px;
}

.active {
  background: green;
  color: #fff;
}
</style>02_style 绑定样式
html
<!-- /uniappV3Demo1/pages/index/index.vue -->

<template>
  <!-- 1.绑定内联样式 -->
  <view class="box" :style="{width: '300px',height:260+'px',fontSize: size +'px'}">内联样式</view>
</template>

<script setup>
import { ref } from "vue";

const size = ref(30);

// 2.修改 size 的值
let i = 0;
setInterval(() => {
  i++;
  size.value += i
}, 1000)
</script>

<style lang="scss" scoped>
.box {
  width: 200px;
  height: 200px;
  background: orange;
  font-size: 20px;
}
</style>05_方法事件 + 内置组件事件
01_方法事件
html
<!-- /uniappV3Demo1/pages/index/index.vue -->

<template>
  <!-- 1.使用 v-on 指令(简写为 @) 来监听 DOM 事件 -->
  <view class="box" @click="onClick">
    {{ num }}
  </view>
</template>

<script setup>
import { ref } from "vue";
const num = ref(1);

// 2.定义一个方法
function onClick() {
  num.value++;
}
</script>

<style lang="scss" scoped>
.box {
  width: 200px;
  height: 200px;
  background: orange;
}
</style>02_更改颜色案例
html
<!-- /uniappV3Demo1/pages/index/index.vue -->

<template>
  <!-- 1.点击事件, 点击时调用 onClick 方法 -->
  <view class="box" @click="onClick" :style="{ background: color }"></view>
</template>

<script setup>
import { ref } from "vue";
const color = ref('#fc359a');

// 2.点击事件处理函数, 用于生成随机颜色并赋值给 color 变量
function onClick() {
  color.value = "#" + String(Math.random()).substring(3, 9)
}
</script>

<style lang="scss" scoped>
.box {
  width: 200px;
  height: 200px;
  background: orange;
}
</style>03_内置组件事件
html
<!-- /uniappV3Demo1/pages/index/index.vue -->

<template>
  <!-- 1.switch 开关选择器; checked 改变时触发 change 事件 -->
  <switch @change="onChange" />
  <button type="primary" :loading="isLoading">普通按钮</button>
</template>

<script setup>
import { ref } from "vue";

const isLoading = ref(false);

// 2.e.detail.value 为开关的选中状态
function onChange(e) {
  isLoading.value = e.detail.value
}
</script>

<style lang="scss" scoped></style>06_v-if 和 v-show 条件渲染
01_v-if 条件渲染
条件性地渲染一块内容
html
<!-- /uniappV3Demo1/pages/index/index.vue -->

<template>
  <view class="">
    <!-- 1.v-if v-else -->
    <view v-if="shop">京东</view>
    <view v-else>淘宝网</view>

    <!-- 2.v-if v-else-if v-else -->
    <view v-if="day === 1">星期1</view>
    <view v-else-if="day === 2">星期2</view>
    <view v-else-if="day === 3">星期3</view>
    <view v-else-if="day === 4">星期4</view>
    <view v-else-if="day === 5">星期5</view>
    <view v-else-if="day === 6">星期6</view>
    <view v-else-if="day === 7">周末</view>
    <view v-else>格式错误</view>
  </view>
</template>

<script setup>
import { ref } from "vue";
const shop = ref(true);
const day = ref(3);
</script>

<style lang="scss" scoped></style>02_v-if 对比 v-show
v-show 条件渲染
- 另一个按条件显示一个元素
html
<!-- /uniappV3Demo1/pages/index/index.vue -->

<template>
  <!-- 1.v-if 如果在初次渲染时条件值为 false, 则不会做任何事; 条件区块只有当条件首次变为 true 时才被渲染 -->
  <view class="box1" v-if="false">
    <image src="../../static/pic1.png" mode=""></image>
  </view>

  <!-- 2.v-show 元素无论初始条件如何, 始终会被渲染, 只有 CSS display 属性会被切换 -->
  <view class="box2" v-show="false">
    <image src="../../static/pic2.png" mode=""></image>
  </view>
</template>

<script setup>

</script>

<style lang="scss" scoped></style>03_template 包装器
html
<!-- /uniappV3Demo1/pages/index/index.vue -->

<template>
  <!-- 1.template 不可见的包装器元素, 最后渲染的结果并不会包含这个 template 元素 -->
  <template v-if="true">
    <image src="../../static/logo.png" mode=""></image>
    <view>logo</view>
  </template>

  <template v-else>
    <image src="../../static/pic4.jpg" mode=""></image>
    <view>pic4</view>
  </template>
</template>

<script setup>

</script>

<style lang="scss" scoped></style>07_v-for 列表渲染
01_v-for 列表渲染
渲染一个列表
- 提供一个唯一的 key, 从而重用和重新排序现有的元素
html
<!-- /uniappV3Demo1/pages/index/index.vue -->

<template>
  <view class="out">
    <!-- 1.使用 v-for 指令循环渲染 10 个 box 模块; 提供一个唯一的 key, 从而重用和重新排序现有的元素 -->
    <view class="box" v-for="(item, index) in 10" :key="index">box 模块 - {{ index + 1 }}</view>

    <!-- 2.遍历 nba 数组, 将每个元素赋值给 item -->
    <view v-for="item in nba" :key="item.id">
      球星: {{ item.name }} - 球衣: {{ item.num }}
    </view>
  </view>
</template>

<script setup>
import { ref } from "vue";
const nba = ref([
  { id: 1, name: "乔丹", num: 23 },
  { id: 2, name: "詹姆斯", num: 6 },
  { id: 3, name: "科比", num: 24 },
])
</script>

<style lang="scss" scoped></style>08_购物车案例
01_购物车案例
- 提供一个唯一的 key, 以便它可以跟踪每个节点的标识, 从而重用和重新排序现有的元素
html
<!-- /uniappV3Demo1/pages/index/index.vue -->

<template>
  <view class="out">
    <!-- 1.提供一个唯一的 key, 以便它可以跟踪每个节点的标识, 从而重用和重新排序现有的元素 -->
    <view class="item" v-for="(item, index) in goods" :key="item.id">
      <checkbox></checkbox>
      <text text class=" title">{{ item.name }}</text>
      <text class="del" @click="remove(index)">删除</text>
    </view>
  </view>
</template>

<script setup>
import { ref } from "vue";
const goods = ref([
  { id: 11, name: "小米" },
  { id: 22, name: "华为" },
  { id: 33, name: "oppo" },
  { id: 44, name: "苹果" }
])

function remove(index) {
  goods.value.splice(index, 1)
}
</script>

<style lang="scss" scoped>
.out {
  padding: 10px;

  .item {
    padding: 10px 0;

    .del {
      color: #c00;
      margin-left: 30px;
    }
  }
}
</style>09_表单 @focus 和 @blur 事件
01_表单 @focus 和 @blur 事件
html
<!-- /uniappV3Demo1/pages/index/index.vue -->

<template>
  <view class="out">
    <!-- 1.@focus 输入框聚焦时触发; @blur 输入框失去焦点时触发 -->
    <input type="text" :value="iptValue" @focus="onFocus" @blur="onBlur" />

    <!-- 2.设置图片的 class 属性, 当 isActive 为 true 时, 添加 active 类 -->
    <image src="../../static/chicken.gif" mode="" class="pic" :class="isActive?'active':''" />
  </view>
</template>

<script setup>
import { ref } from "vue";
const iptValue = ref("");
const isActive = ref(false);

// 3.@输入框聚焦时触发
function onFocus(e) {
  isActive.value = true;
}

// 4.输入框失去焦点时触发
function onBlur(e) {
  isActive.value = false;
}
</script>

<style lang="scss" scoped>
.out {
  padding: 0 20px;
  margin-top: 40px;
  position: relative;

  input {
    border: 1px solid #ccc;
    height: 40px;
    position: relative;
    z-index: 2;
    background: #fff;
    padding: 0 10px;
  }

  .pic {
    width: 24px;
    height: 24px;
    z-index: 1;
    position: absolute;
    top: 0px;
    left: calc(50% - 12px);
    transition: top 0.3s;
  }

  .pic.active {
    top: -24px;
  }
}
</style>10_v-model 双向绑定
01_@input 获取输入值
html
<!-- /uniappV3Demo1/pages/index/index.vue -->

<template>
  <view class="out">
    <!-- 1.@input 当键盘输入时, 触发 input 事件 -->
    <input type="text" :value="iptValue" @input="onInput" />

    <view>预览: {{ iptValue }}</view>
  </view>
</template>

<script setup>
import { ref } from "vue";
const iptValue = ref("");

// 2.当键盘输入时, 触发 input 事件
function onInput(e) {
  iptValue.value = e.detail.value;
}
</script>

<style lang="scss" scoped></style>02_v-model 双向绑定
html
<!-- /uniappV3Demo1/pages/index/index.vue -->

<template>
  <view class="out">
    <!-- 1.v-model 双向绑定 -->
    <input type="text" :value="iptValue" v-model="iptValue" />

    <view>预览: {{ iptValue }}</view>
  </view>
</template>

<script setup>
import { ref } from "vue";
const iptValue = ref("");
</script>

<style lang="scss" scoped></style>04_综合案例
01_热梗案例
01_热梗案例
html
<!-- /uniappV3Demo1/pages/index/index.vue -->

<template>
  <view class="title">近期热梗</view>

  <view class="out">
    <view class="list">
      <!-- 1.v-for 列表渲染 -->
      <view v-for="(item, index) in lists" :key="item.id" class="row">
        <view class="text">{{ index + 1 }}. {{ item.title }}</view>
        <!-- 2.onclose 点击删除 -->
        <view @click="onclose(index)" class="close"><icon type="clear" size="26"/></view>
      </view>
    </view>
    <view class="count">共 {{ lists.length }} 条梗</view>

    <view class="comment">
      <!-- 4.v-model 双向绑定; @confirm 回车发布热梗 -->
      <input v-model="iptValut" @confirm="onSubmit" type="text" placeholder="请输入热梗..." />
      <!-- 5.disabled 禁用按钮; onSubmit 发布热梗 -->
      <button :disabled="iptValut.length < 3" @click="onSubmit" size="mini" type="primary">发布</button>
    </view>
  </view>
</template>

<script setup>
import { ref } from "vue";
const lists = ref([
  { id: 111, title: "刚满 18 岁" },
  { id: 222, title: "我不吃牛肉" },
  { id: 333, title: "遥遥领先" },
  { id: 444, title: "哪里贵了" }
])

const iptValut = ref("")

// 3.点击删除
const onclose = function (index){
  lists.value.splice(index, 1)
}

// 6.发布热梗
const onSubmit = function (){
  lists.value.push({ id: Date.now(), title: iptValut.value })
  iptValut.value = ""
}
</script>

<style lang="scss" scoped>
.title {
  font-size: 26px;
  text-align: center;
  color: #3c3c3c;
  padding: 30px 0 15px;
}

.out {
  width: 90vw;
  margin: 15px auto;
  box-shadow: 0 10px 20px rgba(0, 0, 0, 0.1);
  border-radius: 5px;
  padding: 15px;
  box-sizing: border-box;

  .list {
    .row {
      padding: 10px 0;
      border-bottom: 1px solid #e8e8e8;
      display: flex;
      justify-content: space-between;
      align-items: center;
      font-size: 18px;
      color: #333;

      .text {
        padding-right: 5px;
        box-sizing: border-box;
      }
    }
  }

  .count {
    padding: 10px 0;
    font-size: 15px;
    color: #888;
    text-align: center;
  }

  .comment {
    display: flex;
    margin-top: 10px;

    input {
      flex: 4;
      background: #f4f4f4;
      margin-right: 5px;
      height: 100%;
      height: 32px;
      border-radius: 4px;
      padding: 0 10px;
      color: #333;
    }

    button {
      flex: 1;
    }
  }
}
</style>